

Two birth cards for 'Take it Make it' challenge 7 / Deux cartes de naissance
Coucou, Hi,
Je reviens aujourd'hui avec quelque chose de très différent... J'ai fait un ensemble de cartes de naissance ce week-end, en suivant la technique de Lydia Brooke Evans dans le dernier numéro du magazine Craft Stamper. Je ne suis pas très douée en Clean and Simple, mais j'avais très envie d'essayer cette technique, en participant aussi au challenge 7 'Take it, Make it' organisé par ce magazine par la même occasion. Et en regardant le tampon du mois offert (un adorable petit faon et 2 mini champignons), j'ai pensé qu'ils iraient parfaitement pour ce que je devais absolument faire ce week-end, étant déjà très en retard aie........ Une jolie carte aux motifs enfantins pour célébrer la naissance d'une petite cousine ! J'ai choisi le plus petit des deux champignons.
La technique consiste à répéter un petit tampon à intervales régulier... On peut ainsi créer un joli papier de fond fait main. Pour faire bien les choses, mieux vaut s'aider d'une règle et d'un crayon, on trace de très légères diagonales dans les deux sens sur toute la longueur de la carte (à la fin on gomme) et le tour est joué ! Enfin presque hein... :)))
I chose the small mushroom stamp by Emily Hilton offered also with the magazine of March, and took a set of three different Versamagic dew drop ink pads, either in roses (for my two finished cards) or greens (for a third one started). I also added a few red mushrooms clear embossed to make a change. I strictly applied the method indicated by Lydia using a ruler and a pencil to get perfect alignment, that works well and I really recommend it also! To finish with my backgrounds, I shaded slightly the edges (couldn't resist to do it haha!!!). It was a true challenge for me, I'm not a specialist of Clean and Simple cards (even not a specialist of cards at all, really..), so it was out of my comfort zone, but I enjoyed the result! Also, I really had fun to apply this technique to try to make a sweet and cute card to celebrate the birth of a little girl of someone important for me. Hope you will appreciate my efforts and like the result! Maybe it will inspire you some similar birth cards for such an occasion, I would be very happy if that were the case.
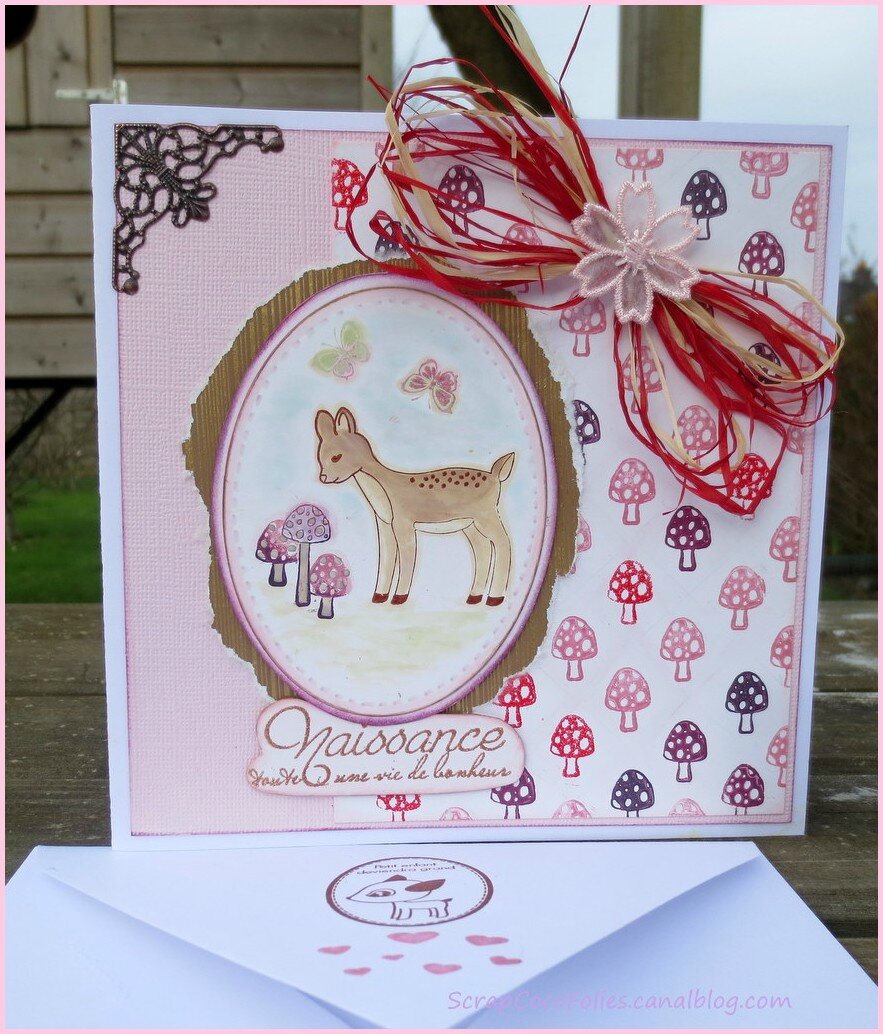
I stamped my little scene onto a white silk card from Crafty individuals, after masking the tall mushroom.. Colouring was done using distress ink pads and a fine water brush. I also used a marker (Milled Lavender or Spun Sugar, can't remember!) to draw a dotted line inside. I matted my die-cut oval on a larger oval hand-made, and on a piece of Gold Paper Roll torn up to roughly follow the oval shape.
J'en ai profité pour faire une seconde carte... toujours pour optimiser mon temps et mes créations. J'en garde une en exemple pour une autre occasion...
I took the opportunity to create a second card... still in the hope to optmize my creative process! :) I keep this one for another occasion...

Sur celle-ci, j'ai collé des petits bouts de ruban encrés à la distress Spun Sugar, et j'ai rajouté un beau champignon encré dans les mêmes couleurs, et une fleur encrée et découpée avec un Die Shapeabilities (Flowers Creations 3).
On this second card, I have glued small strips of leftover ribbon inked with distress Spun Sugar, and added a beautifil JOFY mushroom and a flower die cut from my Shapeabilities 'Flowers Creations 3', layered and inked.

Une petite photo d'une partie de mon matériel et d'une étape de ma création. Je l'ai prise pour vous montrer comment j'ai créé un cadre ovale un peu plus grand que celui de mon die, ayant déjà utilisé la plus grande taille)...
You can see below part of the supplies I used, and one step of my creation. At this stage I drawed an oval frame larger than the die I used to frame my fawn.

Pour finir, je vous montre aussi un troisième fond de carte que je me suis amusée à faire en suivant la même technique!... Pas eu le temps de la finir celle-ci, mais au moins ça me fait un joli fond d'avance, je suis contente. :)
I enjoyed doing a third background using the same technique and stamp but in other (green) colours, I show you the result although this card is not finished yet... just ready to be used, and that's fine too. To make a change, I completed it with an embossed paper (I used a 'bricks' embossing folder) and distressed it a bit in green and brown.

Et une petite photo du tout!
And a last photo of the whole set of cards!

Materials:
Stamps: Emily Hilton, Katzelkraft ('Naissance'), Craft Origine, Paper Artsy JOFY11, Crafty Individuals CI-292 (small butterflies)
Tsukineko Versamagic - Dew drop ink pads: set of 3 'Pinks' and set of 3 'Greens' (Crafty Individuals's shop), Archival Ink Coffee, Distress stains and inks Spun Sugar, Milled Lavender, Dusty Concord, Shabby Shutters, Vintage Photo, Old Paper, Tea Dye, Seedless Preserve,
Distress markers Milled Lavender, Spun Sugar
Embellishments: Old copper flat filigree corner charm (Crafty Individuals's shop), red and natural raffia, one embroided flower (Les broderies de Marie-Jo), rose ribbon (Isa's Art)
Spellbinders Nestabilities - Classic Ovals, Flower Creations 3 Shapeabilities Dies, M-Bossabilities reversible embossing folder - Bricks and wood - (green card)
Papers: Bazill papers, white silk cards (Crafty Individuals), white double card (16x16 cm) and its envelope, Paper Roll (Isa's Art)
Embossing powders Glittered Clear, Caramel, Red
Thanks for stopping by! Time for me to take a short rest before going to beddy-byes (love this English expression!), enjoy the rest of your week! :) HUGS xxxx
Merci de votre visite de votre fidélité, je file au lit en vous souhaitant à tous une excellente fin de semaine! Bisessss


/http%3A%2F%2Fstorage.canalblog.com%2F93%2F22%2F825842%2F116841126_o.jpg)
/http%3A%2F%2Fstorage.canalblog.com%2F11%2F15%2F825842%2F111356086_o.jpg)
/http%3A%2F%2Fstorage.canalblog.com%2F60%2F29%2F825842%2F110951982_o.jpg)
/http%3A%2F%2Fstorage.canalblog.com%2F53%2F67%2F825842%2F110180795_o.jpg)
/https%3A%2F%2Fprofilepics.canalblog.com%2Fprofilepics%2F7%2F1%2F714973.jpg)
/https%3A%2F%2Fstorage.canalblog.com%2F44%2F56%2F825842%2F75154843_o.jpg)
/https%3A%2F%2Fstorage.canalblog.com%2F38%2F50%2F825842%2F73171294_o.jpg)
/https%3A%2F%2Fstorage.canalblog.com%2F14%2F74%2F825842%2F73150094_o.jpg)
/https%3A%2F%2Fstorage.canalblog.com%2F24%2F02%2F825842%2F72312220_o.jpg)
/https%3A%2F%2Fstorage.canalblog.com%2F44%2F28%2F825842%2F80772695_o.jpg)